The HD Phantom Specification
The Phantom Body
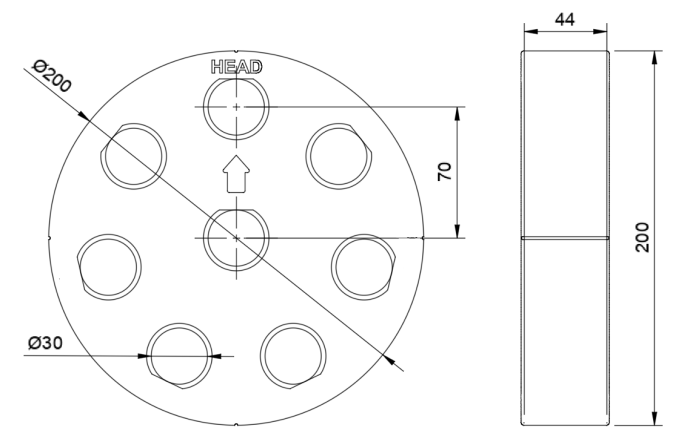
Overall shape
- 200 mm diameter
- 40 mm target depth
- Mold is 44 mm deep to accommodate resin shrinkage
- 8 insert slots, 30 mm in diameter
- 7 evenly space peripheral 70 mm from center (refer to @fig-ph-body)
- 1 central
- Slots have a 2 mm lip to consistently seat inserts in the phantom
- Slots have a keyed face to consistently orient inserts in body
- 70 mm separation between central and peripheral insert centers
Markings
- “Head” label on the phantom face
- Disambiguates cranio-caudal vs. caudo-cranial scan directions
- Exterior alignment grooves
- Facilitates phantom centering
- Arrow indicating pseudo-arbitrary “up” direction
- Up arrow should point to the “head” label
- Arrow should lie along a line connecting central insert slot to a peripheral insert slot
- Ensures phantom is rotationally consistent across scan sessions
- Recessed (rather than filled) markings
- Tactile feedback for all users
- Provides contrast on CT
Manufacture
We intend for others to manufacture their own phantom bodies and thus include the following as part of the standard.
The phantom body should be produced in two stages:
- 3D print the phantom body mold
- Print using a white PLA filament
- Use printer defaults
- 0.28 mm layer height is recommended for faster print times
- During slicing, add additional top/bottom/wall layers to prevent infill
- No supports should be required
- Fill the phantom body mold with a curing resin
- Ensure selected resin curing temperatures will not deform the 3D printed plastic (see below)
- Measure resin/hardener by weight, ensuring manufacturer recommended ratio is as precise as possible
- Mix resin/harder thoroughly (recommended to use a drill, stir for 5-10 minutes or as cure times allow)
- Place mixed resin in a vacuum chamber to remove intermixed air
- Pour vacuumed resin into the printed mold and allow to cure entirely
Modular inserts

Overall shape
- 30 mm diameter
- Small tolerance adjustments made to wall thickness for better mechanical fit
- 44 mm measurement region height
- 47 mm overall height to accommodate actual phantom depth
- 2 mm rounded lip for consistent depth seating in phantom body
- Seating lip has a keyed face to accommodate consistent insert orientation in the phantom body
Manufacture
- 3D print the desired modular insert
- Use printer defaults (0.2mm layer height recommended)
- Use infill for non measurement regions
- Use solid (100%) infill for measurements regions
- No supports should be required
Reproducibility Recommendations
3D Printing
We recommend using optimized printer settings for your printer. Adjusting layer height can save printing time, if needed. We recommend the layer heights in the specification above.
Any modern 3D printer with a large enough print bed should be capable of reproducing this work. Tolerances will likely vary from printer to printer. We have utilized a Bambu Labs X1 Carbon printer in our work.
If a 3D printer is unavailable, online 3D printing services are available.
3D Printer Filament
Using a high quality, properly dried PLA filament will make for a better overall experience including mechanical fit between inserts and phantom body. The epoxy resin used in our work adheres well to the PLA. PLA is also the safest to print and most readily available of all the filaments.
We have observed some variation in CT number due to filament color, and thus recommend using un-dyed or white PLA filament. Additives are often used for “glow-in-the-dark” or similar modified PLA filament and have a notable impact on CT number. We do not recommend any specific filament as part of the specification, however we have utilized Bambu Labs Jade White PLA in our work and found it to be suitable for phantoms and inserts.
PET-G is incompatible with the epoxy resins we have tested. We do not recommend PET-G.
We have only done limited testing with ABS, however due to safety considerations we strongly recommend PLA over ABS.
Resin curing temperatures
Many resins emit substantial heat during the curing process that will deform printed PLA filament. Curing temperatures increase with resin volumes and the phantom body depth is near what many of the most commonly available resins recommend.
Slow-curing or deep pour resins tend to be targeted at applications like ours and cure at low enough temperatures to prevent deformation.
We do not recommend any specific resin as part of the specification, however we have found the Teexpert Deep Pour Resin to be suitable for phantom bodies.
Air removal
Poorly mixed or under-vacuumed epoxy does appear to create some undesirable variability in phantom body background attenuation and so some amount of care and attention should be paid to standardize this during manufacture.
We recommend aiming for consistent mixing times (e.g., 10 minutes) and consistent vacuum times (e.g., 30 minutes) rather than often-recommended, but less-precise visual cues such as “substantial decrease in bubbling.”
Ensure resin has adequate space to de-gas in the vacuum chamber. There is typically a substantial increase in resin “volume” as the initial bulk of the intermixed air comes out of solution. For this reason, we don’t recommend trying to use the phantom body mold to hold the resin during vacuuming. Vacuum then move to the mold.
When transferring the mixed and vacuumed resin into the mold, pouring the resin onto/over a wooden stir stick prevents large air bubbles from being introduced into the resin mixture
Any suitably large vacuum chamber will work. The linked chamber and pump were utilized in our work.
Final thoughts
If you manufacture an HD Phantom, please consider sharing your experience and thoughts with us! We are unlikely to be able to provide direct input or support for most users, however if you encounter difficulties or find the process unclear we would also appreciate hearing any feedback you are willing to share. Thank you!